December 5, 2023
SwErl: A Simpler Way
I’m speaking at Code BEAM America in March. I’d love to see you there!
Want a way to simplify your Swift asynchronous code? Come and See! You’ll be surprised how easy it can be using the SwErl package. Async-Await is too wordy and complicated. The SwErl package has a simpler way, and it is fast.
Need some pre-built actors like state machines and event handlers? The SwErl package has these and other prebuilt actors ready for you to use, and they are already thread safe. Come and see!
Oh, and by the way, SwErl allows any Swift app on any device, watch, phone, tablet, laptop, or server, be part of an Erlang/Elixer system!!

July 17, 2023
Present and Future of Programming
For over seven decades, programming has meant writing highly detailed code in what we think of as third generation languages. Examples of these would be Fortran,Cobol, C, C++, Java, C#, ML, Haskell, Rust, Swift, Kotlin, and Erlang among thousands of others. These languages have served us well. They have allowed us to write large amounts of code that would have been prohibitive using second generation languages. These types of languages have and are reaching the scale that applications of significant size are rarely fully comprehensible by an individual, let alone a single team.
In an attempt to solve this problem, groups of teams now build applications. Some of these teams may be building libraries used by the team producing the application. They may not even be part of the same organization creating the application. These libraries may be open or closed-source and may be free or the team producing the application may have to pay for access to the code or for support. Often these teams are not thought of as working on the final product, but in reality they are major contributors with tasks and agendas that may or may not align with the needs of the application production team.
Just as there was a large change in scale for the amount of code a single programmer could remember and work with when the industry moved from second to third generation languages, fourth generation languages could allow even greater scalability.
There have been attempts at producing fourth generation languages since at least the 1980’s. These attempts were limited by technologies available at the times these attempts were made. There is now a new tool available to use that can dramatically shift the way programmers work. Instead of writing code, programmers could describe what they want to a trained Large Language Model (LLM) or some other type of Machine Learning (ML) or Artificial Intelligence (AI) and have that tool generate byte code, intermediate code, or binary executables of any kind appropriate to the machine, be it physical or virtual.
So here is the invention. It is the combination of some LLM, LM, or AI combined with one or more sets of training data so that, through textual, audio, visual, or any other type of interaction with a human or other programmer, byte code, intermediate code, or binary executables of any kind appropriate to the machine, be it physical or virtual are produced by the LLM, LM, or AI. The resultant executable could be displayed directly to the human or other programmer. The resultant executable could also be stored for direct execution, or as a byte code, intermediate code, or binary library or some other unknown type of executable for later use. Additionally, the LLM, LM, or AI – human interaction or interactions could be stored as text, audio, or any other format.
Hopefully, this is sufficient to keep anyone from patenting this method of creating executable code, be they applications, libraries, or of some other yet unknown type. It is true that other tools will be needed to support the programmer. These tools are not part of this invention.
May 23, 2021
Pure Tone Generation
It has been a long time since I last wrote a posting for this blog.
I recently had an opportunity to create some Swift 5 code for generating and playing pure tones using AVFoundation. I put the code in a gist and thought I’d share it here.
The code uses a semaphore to block until the tone completes playing and plays the tone on a background thread. Even so, realize that the thread you are calling from will be blocked so you may need to wrap a call to the playPureTone(frequencyInHz, amplitude, durationInMillis, completion) function in a closure passed to a DispatchQue.
Enjoy.
| // | |
| // | |
| // Swift Pure Tone Generation | |
| // | |
| /* | |
| Copyright (c) 2021 Lee Barney | |
| Permission is hereby granted, free of charge, to any person obtaining a | |
| copy of this software and associated documentation files (the "Software"), | |
| to deal in the Software without restriction, including without limitation the | |
| rights to use, copy, modify, merge, publish, distribute, sublicense, | |
| and/or sell copies of the Software, and to permit persons to whom the Software | |
| is furnished to do so, subject to the following conditions: | |
| The above copyright notice and this permission notice shall be | |
| included in all copies or substantial portions of the Software. | |
| THE SOFTWARE IS PROVIDED "AS IS", WITHOUT WARRANTY OF ANY KIND, EXPRESS OR IMPLIED, | |
| INCLUDING BUT NOT LIMITED TO THE WARRANTIES OF MERCHANTABILITY, FITNESS FOR A | |
| PARTICULAR PURPOSE AND NONINFRINGEMENT. IN NO EVENT SHALL THE AUTHORS OR COPYRIGHT | |
| HOLDERS BE LIABLE FOR ANY CLAIM, DAMAGES OR OTHER LIABILITY, WHETHER IN AN ACTION OF | |
| CONTRACT, TORT OR OTHERWISE, ARISING FROM, OUT OF OR IN CONNECTION WITH THE SOFTWARE | |
| OR THE USE OR OTHER DEALINGS IN THE SOFTWARE. | |
| */ | |
| import Foundation | |
| import AVFoundation | |
| func playPureTone(frequencyInHz: Int, amplitude: Float, durationInMillis: Int, completion: @escaping ()->Void) { | |
| //Use a semaphore to block until the tone completes playing | |
| let semaphore = DispatchSemaphore(value: 1) | |
| //Run async in the background so as not to block the current thread | |
| DispatchQueue.global().async { | |
| //Build the player and its engine | |
| let audioPlayer = AVAudioPlayerNode() | |
| let audioEngine = AVAudioEngine() | |
| semaphore.wait()//Claim the semphore for blocking | |
| audioEngine.attach(audioPlayer) | |
| let mixer = audioEngine.mainMixerNode | |
| let sampleRateHz = Float(mixer.outputFormat(forBus: 0).sampleRate) | |
| guard let format = AVAudioFormat(commonFormat: AVAudioCommonFormat.pcmFormatFloat32, sampleRate: Double(sampleRateHz), channels: AVAudioChannelCount(1), interleaved: false) else { | |
| return | |
| } | |
| // Connect the audio engine to the audio player | |
| audioEngine.connect(audioPlayer, to: mixer, format: format) | |
| let numberOfSamples = AVAudioFrameCount((Float(durationInMillis) / 1000 * sampleRateHz)) | |
| //create the appropriatly sized buffer | |
| guard let buffer = AVAudioPCMBuffer(pcmFormat: format, frameCapacity: numberOfSamples) else { | |
| return | |
| } | |
| buffer.frameLength = numberOfSamples | |
| //get a pointer to the buffer of floats | |
| let channels = UnsafeBufferPointer(start: buffer.floatChannelData, count: Int(format.channelCount)) | |
| let floats = UnsafeMutableBufferPointer<Float>(start: channels[0], count: Int(numberOfSamples)) | |
| //calculate the angular frequency | |
| let angularFrequency = Float(frequencyInHz * 2) * .pi | |
| // Generate and store the sequential samples representing the sine wave of the tone | |
| for i in 0 ..< Int(numberOfSamples) { | |
| let waveComponent = sinf(Float(i) * angularFrequency / sampleRateHz) | |
| floats[i] = waveComponent * amplitude | |
| } | |
| do { | |
| try audioEngine.start() | |
| } | |
| catch{ | |
| print("Error: Engine start failure") | |
| return | |
| } | |
| // Play the pure tone represented by the buffer | |
| audioPlayer.play() | |
| audioPlayer.scheduleBuffer(buffer, at: nil, options: .interrupts){ | |
| DispatchQueue.main.async { | |
| completionBlock() | |
| semaphore.signal()//Release one claim of the semiphore | |
| } | |
| } | |
| semaphore.wait()//Wait for the semiphore so the function doesn't end before the playing of the tone completes | |
| semaphore.signal()//Release the other claim of the semiphore | |
| } | |
| } |
March 16, 2018
Swiftly Drag
I was asked for help this week. A person wanted to know how to move User Interface (UI) items around on the screen and be able to drop them on other UI items within the same app. He was writing in Swift for MacOS. I thought it would be easy to find and a good, simple, example. Turns out it wasn’t that easy to find.
There were a lot of examples of dragging files of different types onto or out of an app and dropping them. There were plenty of examples of dragging UI items out of an app to another app. Most of these examples were way over complicated, only had parts of the code shown, or were done with a shallow or poor explanation of what was happening. Yet where was the example this person wanted? I couldn’t find one so I wrote what you see here.
The first thing you need to know to make this example easier to understand is that on MacOS drag-and-drop implementations use the clipboard…the same clipboard used by copy-paste behavior. When you start dragging, you put the UI item being dragged into the clipboard so you can get at it later when you do the drop portion of the code.
Another important point is that this doesn’t need to involve a view controller. The simplest solution doesn’t require a new view controller and doesn’t the existing one generated for you when you create an app in xCode. All you need is some basic programming knowledge to understand the design.
The specific request I got was for help dragging one UI Label and dropping it on another UI Label. That means a dragging source and a dropping location is needed and both of these will need to be NSTextFields, the class-type of Labels created in MacOS storyboards. These don’t come with any built-in drag-and-drop behavior so we will need to add that in. NSTextFields do have a default behavior for other mouse events like mouseEntered, mouseExited, mouseDown, etc. This example modifies those basic behaviors.
To modify and add these behaviors all that is needed is the fundamental Object Oriented concept of inheritance. In other words, you will need to extend NSTextField. I decided to create two extensions called DraggableLabel and DroppableLabel. You can drag an instance of DraggableLabel and drop it on an instance of DroppableLable after you are done creating the code.
The entire code set is available in my gitHub repo. You may want to get it now before reading the rest of this posting.
Before getting into the code let’s take a look at the storyboard.

I placed two Labels on the view by dragging them on and changing the text to read “Draggable” and “Target”. You can also see the “Draggable” label’s class, in the upper right hand corner, has been changed to be DraggableLabel. What you can’t see in this picture is the “Target” label’s class has also been changed. It is DroppableLabel.
That’s it. Now all we need to do is create the code for Draggablelabel and DroppableLabel. Let’s start with Draggablelabel since it is where the behavior starts and also requires the most code.
Since NSTextField is part of the Cocoa library Cocoa must be imported. Also, to get this to work DraggableLabel must inherit from NSTextField and adopt two protocols, NSDraggingSource and NSPasteboardItemDataProvider.
import Cocoa
class DraggableLabel:NSTextField, NSDraggingSource, NSPasteboardItemDataProvider{
.
.
}
Let’s start with the only override of behavior needed for NSTextField and create a mouseDown method for DraggableLabel. Initially, these four lines of code look worse than they are. It will be a lot easier if you remember that the clipboard (NSPasteboard) is used for the data transfer during dragging.
Let’s break down the lines of code you see below. I’ve numbered them to make it easier to refer to each of them.
Line 1 creates an instance of an NSPasteboardItem that will eventually be used to create the data included in the drag operation.
When the user drags a UI item they don’t actually drag a real UI item. Instead, they drag an image of the item. So in our case the type will be tiff. Remember, this isn’t the type of the data being moved during the drag it is the type of the ‘thing’ the user sees. This is why line 2 sets the item type to tiff for the NSPasteboardItem instance. Line 2 also passes self to the setDataProvider method. This is only possible because DraggableLabel adopted the NSPasteboardItemDataProvider protocol.
Line 3 creates a NSDraggingItem. This is what the user will see move across the screen during the drag. Because of this the draggingItem needs the pasteboardItem to be able to generate the appropriate tiff image. That is why it is included in this initialization call.
import Cocoa
class DraggableLabel:NSTextField, NSDraggingSource, NSPasteboardItemDataProvider{
override func mouseDown(with theEvent: NSEvent) {
1: let pasteboardItem = NSPasteboardItem()
2: pasteboardItem.setDataProvider(self, forTypes: [NSPasteboard.PasteboardType.tiff])
3: let draggingItem = NSDraggingItem(pasteboardWriter: pasteboardItem)
4: draggingItem.setDraggingFrame(self.bounds, contents:takeSnapshot())
5: beginDraggingSession(with: [draggingItem], event: theEvent, source: self)
}
.
.
.
}
Line 4 takes a ‘snapshot’ of a region, the dragging frame, of the screen and uses this as the image the user will see as they do the drag. I’ve created a helper method, takeSnapshot, to make this easier to read. We’ll look at it later.
Line 5 uses the beginDraggingSession method that is part of all NSView instances to start the drag. It requires an array of ‘things’ to drag since you may want the user to drag multiple items. In this case there is just one thing to drag and that is the draggingItem instance created in line 4. It also requires us to pass along the mouse event, and, now the most important part, self is passed. By passing self to the dragging session a reference to it becomes available in the code that handles the drop event.
The takeSnapshot helper method is, I think, self explanatory and is included here for completeness. It captures an image of what is on the screen within the bounds of the DraggableLabel.
func takeSnapshot() -> NSImage {

            let pdfData = dataWithPDF(inside: bounds)

            let image = NSImage(data: pdfData)

            //if image is not nil return it else generate empty NSImage

            return image ?? NSImage()

    }
There are still two small methods needed. The first is required because DraggableLabel adopted the NSPasteboardItem protocol. It has to be here, but doesn’t need to do anything for this example.
func pasteboard(_ pasteboard: NSPasteboard?, item: NSPasteboardItem, provideDataForType type: NSPasteboard.PasteboardType) {
}
The second method is required by any class adopting the NSDraggingSource protocol.
func draggingSession(_ session: NSDraggingSession, sourceOperationMaskFor context: NSDraggingContext) -> NSDragOperation {

            return NSDragOperation.generic

    }
The only line of code to write for this function returns the type of dragging to be done. In our case generic was selected. There are many other options. By selecting generic we’ve allowed the drop location to decide how to handle the data. We could have selected move, delete, or other options at this point, but I didn’t want to. Instead, by selecting generic I could have different behaviors depending on which UI item it is dropped on. I like that flexibility.
You have now seen most of the code. The worst part is behind you. Now let’s take a look at the code for the DroppableLabel class.
DroppableLabel also inherits from NSTextField. It won’t add any new methods or adopt any protocols. It overrides only three methods of NSTextField to get the behavior wanted.
The first function to be overridden is awakeFromNib. This method of all NSObject instances is called when the storyboard is being interpreted and the objects declared there are being created by the run-time system for MacOS applications. This happens before the user sees anything on the screen.
awakeFromNib is overridden here so the DroppableLabel will be able to accept tiff type items dropped on it. This is done using the registerForDraggedTypes method of all NSView instances such as DroppableLable.
import Cocoa
class DroppableLabel:NSTextField{
override func awakeFromNib() {
registerForDraggedTypes([NSPasteboard.PasteboardType.tiff])
}
override func draggingEntered(_ sender: NSDraggingInfo) -> NSDragOperation {
guard sender.draggingSource() is DraggableLabel else{
return [];
}
return .copy
}
override func performDragOperation(_ sender: NSDraggingInfo) -> Bool {
guard sender.draggingSource() is DraggableLabel else{
return false;
}
print("You dropped \((sender.draggingSource() as! DraggableLabel).stringValue) on me!")
return true
}
}
The second overridden method is draggingEntered, a method of all instances of NSDraggingDestination. Since NSTextField already inherits from NSDraggingDestination we can override the method without having to do inheritance ourselves. The important part of this method is the last one, “return .copy”. Here is where we declare that the data is to be copied instead of deleted, linked to, or the other available options when something is dropped on this instance of DroppableLabel. This is needed here because generic was selected as the drag operation type in the implementation of DraggableLabel.
The last method to override, performDragOperation, is another method of NSDraggingDestination. Here the source added back in the call to beginDraggingSession is accessed and used. The source method parameter is an instance of NSDraggingInfo generated by the call to beginDraggingSession. It contains a reference to the instance of DraggableLabel.
In both of these methods, I’ve included a guard to make sure that only DraggableLables are dealt with in the code. You don’t have to have this check though I would suggest checking the types of items dropped to make sure you handle them correctly. If you have multiple types of items being dropped on a single type of drop location you should check to make sure the dropped item is one of the types you expect.
Well, there it is. Not a whole lot of code is needed to implement this, but it can be difficult to put all the parts together from the existing examples out there on the web.
I’ve uploaded this example to my gitHub repo.
Also, all links are to Apple’s official documentation. Hopefully they’ll be stable. 🙂
February 1, 2016
Swiftly Idle
With the release of the open source Swift compiler, it becomes feasible to write Swift server-side apps for Linux. Server-side apps require two basic components, parallel processing (threading), and the ability to never exit.
While these two requirements are not scheduled to be fully ready for the Linux version of the compiler until Swift 3.0, I wanted to get ahead of the curve and start experimenting now. To do this I decided to design and create, using the Swift 2.2 open source compiler on OS X, an app I’m calling Courier.
Since Courier is intended to run constantly without consuming CPU resources I thought I’d share a code example that keeps the main thread in an idle state but allows the main thread to respond to dispatches from GCD. This fundamental ability is the basis for all servers and other types of monitoring apps…even GUI apps and OS’s.
Below is the code for a function I’m calling waitAndListen. It will setup listening for changes to one of the server’s directories. When a change is detected, it will report what happened.
To make this work, all the listening has to be set up early in the source code. To make the waitAndListen example easier to understand, I’ve moved the code for setting up listening into a function called watchDirectory. We’ll look at that function a little later.
1 func waitAndListen(){
2    //call a custom function to watch for changes in the "stuff" directory.
3    let source = watchDirectory("stuff")
4    //setup the current thread's runloop in an infinite loop
5    //to keep the app going
6    while(true){
7        CFRunLoopRunInMode(kCFRunLoopDefaultMode, 3600.0, true)
8        print("looping")
9   }
10 }
Line 6 is where the good stuff starts. It is the beginning of an infinite loop. Don’t worry. It won’t soak up your CPU cycles. Line 7 makes sure of that. Line 7 is a special function call. What it does is make a OS blocking call that returns every hour (the second parameter) or when the ‘stuff’ directory is changed, which ever comes first. Until then it sits and waits. The first argument isn’t particularly important to this discussion, but the third parameter, a boolean, is used to indicate if CFRunLoopRunInMode should exit after it is interrupted. I’ve set it to true for this example to keep things simpler.
There are more complicated examples of using CFRunLoopRunInMode on the web. Those usually check the return value of CFRunLoopRunInMode to determine if the application should exit. Since I’m writing something that should never exit of its own choice, that kind of check is unneeded.
In short, lines 6 – 9 are all that is needed to create an application designed to never exit normally.
One nice thing about using CFRunLoopRunIn Mode to put the main thread into a waiting state is the main thread can still be used for computation. The watchDirectory function, called in line 3, makes the application to wake up the main thread and use it when changes are made to the ‘stuff’ directory. watchDirectory is longer and more complicated than the code in waitAndListen. We’ll take it a step at a time.
In line 2 below, a file descriptor is created. This descriptor refers to the ‘stuff’ directory and is used later as part of the code required to listen for changes to the ‘stuff’ directory.
Line 4 is where we get a reference to the main thread. If you don’t want to use the main thread for handling changes you can use GCD’s dispatch_get_global_queue instead. If you choose to use the global queue rather than the main thread, the main thread will never be wakened by events. Instead, the background thread will become active each time a change is made.
Grand Central Dispatch (GCD) is a dispatching engine. Line 5 adds a new, non-preexisting event source to GCD. The _VNODE constant tells GCD the type of events it should dispatch are file and directory events. The descriptor for the directory we want to watch is passed as the second parameter so GCD knows which directory to monitor.
The third parameter consists of a series of constants that are assembled using swift’s bitwise OR operator. The options used in this example sets up the dispatch source to include all types of file and directory events. You can restrict these to a smaller set if you choose. Lastly, the queue to dispatch to is passed in as the last parameter.
With a dispatch source added to GCD, GCD needs to be told what to do when a change is made to the directory being watching. That is done by adding the closure beginning on line 7 as a dispatch handler.
1 func watchDirectory(directoryPath: String) -> OS_dispatch_source{
2    let directoryDescriptor = UInt(open(directoryPath, O_RDONLY))
3    //attach the listener to the main thread.
4    let queue = dispatch_get_main_queue()
5    let dispatchSource = dispatch_source_create(DISPATCH_SOURCE_TYPE_VNODE,
                 directoryDescriptor, DISPATCH_VNODE_DELETE
                 | DISPATCH_VNODE_WRITE | DISPATCH_VNODE_RENAME
                 | DISPATCH_VNODE_REVOKE | DISPATCH_VNODE_EXTEND, queue)

 6   //assign a closure to be the listener for directory change events
 7   dispatch_source_set_event_handler(dispatchSource){
 8       let eventType = dispatch_source_get_data(dispatchSource)
 9       //detect the different types of changes and handle them
 10      if((eventType & DISPATCH_VNODE_DELETE) == DISPATCH_VNODE_DELETE
 11          || (eventType & DISPATCH_VNODE_REVOKE) == DISPATCH_VNODE_REVOKE
 12          || (eventType & DISPATCH_VNODE_RENAME) == DISPATCH_VNODE_RENAME
 13          )
 14           {
 16               //handle removing and deleting
 17            }
 18      //when something is added or something is removed from this
 19      //directory it is a WRITE
 20      if((eventType & DISPATCH_VNODE_WRITE) == DISPATCH_VNODE_WRITE)
 21      {
 22           //handle a write
 23      }
 24  }
 25  dispatch_source_set_cancel_handler(dispatchSource){
 26       close(Int32(directoryDescriptor))
 27  }
 28  dispatch_resume(dispatchSource)
 29   return dispatchSource
 30 }
Lines 7 through 24 consists of the code GCD executes each time a change is made to the ‘stuff’ directory. The example above varies its behavior depending on the type of event. It handles deletions and renamings in one way and adding files and directories in another. Before it can handle the events differently, the code must determine the type of event that happened. To do this, the dispatch_get_source_data function (line 8) is called each time a change is made.
Once eventType is set to the type of event that happened, the example uses if conditional statements to handle the various types of events. The event could be directory or file creation, deletions, renaming, etc. You can see the if statements for this example on lines 10 and 20.
There are a bunch of events associated with each if statement. Since I’m preparing to run this code on both OS X and Linux, I’ll need to experiment with the event types on Linux before I can decide exactly how to break up the types across my applications’s statements. I’m assuming there will be differences in how Linux handles these events compared to OS X.
If you want to cancel watching the directory, the dispatch_source_set_cancel_handler must be called. The example shows that function cleaning up the file descriptor that refers to the directory.
Line 28 is very important. If you don’t resume/restart the dispatching engine, no events will ever be captured and dispatched to the listener you’ve areated. In other words, your code for handling the changes to the directory won’t be called when the directory is changed.
Overall the API for watching a directory or file isn’t too bad.
Now….back to creating Courier. 🙂
November 12, 2015
Adding Custom Class Properties with Swift Extensions
The previous posting, Functionally Dreaming with Swift, was an exploration of what is possible when coding for iOS and OS X. As part of the code example I ran across the need to uniquely identify any given user interface element in Interface Builder (IB). One commonly explored way to do this is to use the restoration ID of a UIView as a unique identifier. But this has nothing to do with restoration id’s regular use. Using it for uniqueness but not restoration behavior doesn’t pass ‘the smell test.’ It abuses an existing property and can cause restoration behavior when it is not wanted.
What, then, is a poor Swift programmer to do? Swift extensions can’t add stored properties.
There is a solution. IB has the ability to apply Key-Value coding to any User Interface (UI) element but only for existing properties. Somehow stored properties have to be mocked-up so we can take advantage of IB’s Key-Value coding application. This is actually easier than one would think.
Let’s start by dropping IB from the picture so we can keep things simple. Imagine for some reason you wanted to extend all UIViews (this would include UIButtons, UILabels, UIImageViews, etc.) to have a stored property called sillyName. If all went well then you would be able to set the sillyName attribute in the ViewController’s viewDidLoad method.
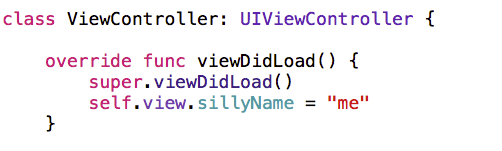
Image 1: Setting a property added by an extension.
Image 1 shows how this would look. Since sillyName would be like any other property it would be set in Swift’s normal way. You would also get the value by putting
let aSillyName = self.view.sillyName
in your code. The way to make this possible it to mock up a custom property.
In Swift, private declarations of structs is allowed in many places. Extensions is one of those places. Let’s draw on that and Swift’s ability to create calculated extension properties. Image 2 shows how to mock up a sillyName stored property as part of an extension.
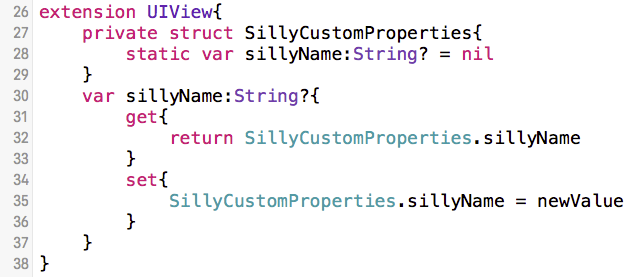
Image 2: The source code for mocking up a stored property.
Lines 27 – 29 embed a private struct into an extension. It is important to understand that this is different than attempting to add a named value (let) or a variable (var) to UIView as a part of the extension. In this case there is no instance of SillyCustomProperties created.
Instead of using an instance, we will use it ‘statically.’ This allows us to write code like line 32. In that line of code, the static struct property is accessed and returned from the get method of the extension’s calculated sillyName property. The sillyName calculated property is defined on line 30 as a String Optional and the setter is defined on lines 34 – 36.
This is a lot of fun, but there is a significant problem with the code in Image 2. The struct and its static values are shared among all UIView instances. That means that there could only be one sillyName and it would be applied to ALL UIViews. Each time it was set it would be updated for all UIViews. This means that we don’t yet have the ability to use this approach to apply unique identifiers to UIViews. If we tried they would all share the same ID. That is NOT good. To solve this problem we need to apply a little Objective-C ‘magic’.
Since UIView’s are instances of Classes and custom key-value pairs CAN be added to any class instance, we can ‘calculate’ a Swift property by storing and retrieving a value using Objective-C Key-Value coding. This can look a little nasty since we will need to call C functions and pass pointers.

Image 3: Mocking stored properties with unique values.
Image 3 contains the ‘magic.’ Let’s replace the bodies of the get and set methods. In the new get method body, the objc_getAssociatedObject function retrieves the value associated with a custom key using Objective-C Key-Value coding. The function has two parameters. The first is the class instance that has the custom key and value. In this example it will be a UIView since we passed self and UIView is what we have extended.
The second parameter is the key for which we want the value. Line 40 shows the NSString pointer to the memory location of sillyName being passed. The & is what forces the parameter to be a pointer. NSString is inferred by the compiler since objc_getAssociatedObject requires an void*, C’s version of Swift’s AnyObject type, as its second parameter. If you would like more information on how to interact with C functions there is an earlier post about that.
The objc_setAssociatedObject is similar to objc_getAssociedObject but has one additional parameter, an indicator stating the memory for the NSString created as a result of calling the function should be retained rather than released. This reserves the memory used for the NSString until we decide to get rid of it (I.E. replace the value associated with sillyName with some other string). Now we can assign unique values to any type of UIView in interface builder.

Image 4: Setting Key-Value pairs using Interface Builder.
Image 3 shows a UIImageView and the Identity Inspector’s (the blue icon in the Utilities list) description of the view. The section titled, “User Defined Runtime Attributes” is IB’s location where you can assign values to the properties of the UIView. In this case the value ‘squiggles’ is assigned to the sillyName property. Since sillyName was mocked up as a stored property of all UIViews by our extension, this definition does not cause a compile-time failure like it would if we hadn’t mocked up sillyName.
With all these pieces in place, we can modify this approach so we can meet the need for unique identifiers for any view. The code for this is almost exactly the same as what you have already seen. As seen in Image 5, the only differences are the name of the Struct and the name of the struct’s String property. Ignore the Bool properties. They are for something else entirely.

Image 5: Mocking up SwiftlyFunctional’s uniqueID
So there you are. This pattern can be used to add ‘stored’ properties to classes. I you want to see how the Unique ID was set for this code look in the Functionally Dreaming with Swift posting.
November 10, 2015
Functionally Dreaming with Swift
Making iOS or OS X apps using a functional programming approach means dealing with a lot of application pieces designed using an Object Oriented (OO) approach if you use the default templates and libraries. The user interface (UI) and the data transmission and storage behaviors for both OS’s are heavily object oriented. This dramatically restricts the space where functional programming designs and techniques can be applied.
Having experienced this restriction I decided to explore what iOS development would be like if the UI behaviors were functional rather than OO in their design. Swift, much more than Objective-C, enables this kind of exploration so I created a Swift example of what could be done. I call it SwiftlyFunctional and an example Xcode project is in my gitHub repository.
Swift uses pass-by-reference for instances of classes and pass by value for structs. To have a ‘truly’ functional approach the UI Elements of iOS and OS X would have to be changed to be structs. That isn’t going to happen and I have no desire to write struct wrappers for the many different types of UI elements in iOS and OS X. It wouldn’t be impossible, but is outside of the scope of what I wanted to explore. I’m chose to ignore this problem as part of my dreaming.
When laying out what I hoped to accomplish, I decided I still wanted to be able to use Interface Builder (IB) to design and layout the UI, but not be restricted to using the Object Oriented (OO) design enforced by the current Xcode templates. Because of this, I decided to dump working with the ApplicationDelegate and ViewController classes generated in a new iOS and OS X projects. Instead of using the ViewController class to add IBAction Selectors to UI elements and gesture recognizers as is traditionally done, I wanted to use Swift functions and closures to handle UI events.
With these goals in mind, I began my dreaming. What I show here is what I came up with but it is only one of many ways this could be done. I’ll show you how to use the SwiftlyFunctional code in this posting. In subsequent postings I’ll describe how some of the more interesting portions of the code work.

Image 1: The structure of a SwiftlyFunctional app
Let’s start with the structure of a functional iOS app. Image 1 shows that the ApplicationDelegate.swift and ViewController.swift files are gone. Instead you can see the SwiftlyFunc.swift and Main.swift files. You can call Main.swift anything you would like except for main.swift. The capitalization is important. If you try to use main.swift you will get a compilation error. This is likely due to the hidden files in all Swift apps that allow for Objective-C interactions. The file main.h is part of the default Objective-C projects.
Main.swift is where you will begin writing the code for your application. It contains the main(application:userView:launchReasons) function. This function acts somewhat similar to the C main function and is the where the app will start running your code.
the main function, as you can see in the example code, is where you can attach Swift functions or closures to application events such as ‘did become active’ and UI elements like buttons, images and labels.
In the example source code, and in Image 2, you can see an example of adding a closure for the ‘did become active’ application event.

Image 2: Attaching a closure to an Application level event.
The addApplicationEventHandler(application:theEventType) function is part of the SwiftlyFunctional API. It can be used to add a closure to any app event except application(didFinishLaunchingWithOptions:launchOptions). That one happens much earlier than will be captured and made available for closures. The addApplicationEventHandler function has three parameters, the application running (this is the first parameter of the main function), an enum for the type of application event to map to, and a closure with no parameters and a void return. In image two the closure only prints a string to the console, but you would be able to perform any computation normally associated with a ‘did become active’ event in iOS.

Image 3: The types of events that can be linked to closures.
image 3 contains the complete list of Application events to which SwifltyFunctional can add closures or function. If other events are added by Apple they can be easily added to the enum.
Assigning closures to events for UIControl elements such as Buttons is nearly the same. One major difference is the closure must be associated with an event triggered by a specific UI element. In the case of the example, this is a UIButton. To make this possible, a reference to the button is needed. The SwiftlyFunctional API has a method, getViewByUniqueID(containingView:anID).
The first parameter passed to getViewByUniqueID in Image 4 is ‘userView.’ This UIView is the same as the second parameter of the main function and represents the topmost view of the view controller in the view hierarchy created in IB.

Image 4: Attaching closures to UIButton events.
The second parameter is the type of event, TouchDown and TouchUpInside for this code snippet. These event types are part of of the standard iOS library UIControlEvents struct. Like the addApplicationEventHandler function, the last parameter is the closure to activate when the event of touchEventType occurs.
Closures can also be attached to gestureRecognizers. In the SwiftlyFunctional example project users Interface Builder to add a TapGestureRecognizer to chalk.png’s UIImageView. The TapGestureRecognizer and the UIImageView both have a uinqueID added to them using KeyPaths. You can see how this is done by examining the right-hand side of Image 5.

Image 5: UITapGestureRecognizer for a UIImageView.
Set up this way, the SwiftlyFunctional’s getViewByUniqueID, getGestureRecognizerByUniqueID, and addTouchEventHandler functions can be used to find the recognizer and attach a closure to it (See Image 6).

Image 6: Attaching a closure to a UIGestureRecognizer event.
Unlike closures for UIControls such as UIButtons, no UIEvent object is passed to the closure by SwiftlyFunctional. UIGestureRecognizers contain the information obtainable from UIEvents. Notice that the location of the tap in the UIImageView is directly available without getting or using a Set of UITouches like you saw in the UIButton code snippet.
So there it is. Now closures can be attached to Application, UIControl, and UIGestureRecognizer events using a functional rather than an OO approach. Take a look at the example project, specifically the SwiftlyFunc.swift file, to see how this was done. I’ll follow up this posting with a couple of explanations of the SwiftlyFunctional code.
November 3, 2015
SwiftlyHybrid and AndyHybrid
In several of my previous posts over the last seven years I’ve described how to use web views with HTML5, CSS3, and JavaScript to develop installable apps for both iOS and Android. The earliest examples lead to the creation of QuickConnect (QC) and influenced the development of its first competitor, PhoneGap/Cordova. Those tools and others like them included extensive ‘bridging code’ to enable calls to Objective-C or Java and then back to JavaScript so the weaknesses of the older versions of the web views could be overcome.
As the iOS and Android web views’ capabilities have grown, the need to augment them with additional native iOS and Android code has decreased. Now audio and video can be recorded and played within the web views. Pictures can be taken and voices can be used to read text. Data can be easily stored and retrieved from local and remote stores. Nearly all of the functionality developers now need is encapsulated in the web views. Because of the continual growth of HTML5, CSS3, JavaScript, and web view support for them, heavy and complicated tools like QC and PhoneGap/Cordova are no longer needed. Instead much lighter and more standardized tools can be used. I’ve created SwiftlyHybrid and AndyHybrid to show what can be done. You’ll find each of them in their gitHub repositories. They are MIT licensed so feel free to do anything you like with them. SwiftlyHybrid has iOS and OS X example projects and AndyHybrid includes an Android Studio example project.
SwiftlyHybrid uses Apple’s WKWebView and the Swift programming language. AndyHybrid uses Google’s WebView that ships with Lollipop and Marshmallow. (Google claims this version of WebView will degrade gracefully when running on older Android OS versions.) Over time, the API’s for these two web views and their HTML5, CSS3, and JavaScript support have been converging. This means it is easier to write hybrid apps than ever before.
For both SwiftlyHybrid and AndyHybrid nearly all applications will only need to replace the HTML, CSS, and JavaScript files with custom ones and be done. For those few apps that still need to do something not possible in the web views’ sandbox I’ve created a standardized way to call from JavaScript to Swift or Android and get results back. HTML5 support and this bridge help SwiftlyHybrid and AndyHybrid use less RAM and CPU than the older QC and PhoneGap/Cordova tools, yet they are less complicated, and just as capable.
If you want to make calls down to Swift for iOS or Java for Android using one or both of these tools, the JavaScript code is the same. Here is a silly example that works for Both SwiftlyHybrid and AndyHybrid. In the example a message is put together and then past to the native code using the postMessage method.
var clicks = 0
function sendCount(){

    var message = {"cmd":"increment","count":clicks,
                           "callbackFunc":function(responseAsJSON){
        var response = JSON.parse(responseAsJSON)
        clicks = response['count']
        document.querySelector("#messages_from_java").innerText =
                                                  "Count is "+clicks
    }.toString()}
    native.postMessage(message)
}
The message is a JavaScript associative array. it contains the command “increment” and some data, the current value of the “clicks” variable, and a callback function. Calling the postMessage function provided by both SwiftlyHybrid and AndyHybrid will convert the message associative array into JSON and send it to the native code portion of your app. In order for the callback function to be passed, it must be converted to a string otherwise the JSON library will strip it out. Since this message isn’t going across the internet or an internal network we don’t have to worry about XSS attacks so executing the string in the native code as JavaScript isn’t a security issue.
The Swift code for handling the message is in the SwiftlyMessageHandler.swift file in the SwiftlyHybrid example. It looks like this:
let command = sentData["cmd"] as! String
        var response = Dictionary<String,AnyObject>()
        if command == "increment"{
            guard var count = sentData["count"] as? Int else{
                return
            }
            count++
            response["count"] = count
        }
        let callbackString = sentData["callbackFunc"] as? String
        sendResponse(response, callback: callbackString)
The current count is first pulled from the data sent from JavaScript. It is incremented and then SwiftlyHybrid’s sendResponse method is used to execute the callback JavaScript function using the response dictionary as a parameter to the JavaScript callback function.
The Java code for AndyHybrid is very similar. It is in the JavaScriptCommunication.java file.
HashMap<String, Object> message = (HashMap) JSONUtilities.parse(aMessageAsJSON);
String command = (String)message.get("cmd");
Serializable response = null;
if(command.equals("increment")){
       long count = (long)message.get("count");
       count++;
       HashMap<String,Object> dataMap = new HashMap<>();
       dataMap.put("count",count);
       response = dataMap;
}
String asyncCallback = (String) message.get("callbackFunc");
sendResponse(response, asyncCallback);
In both languages the command is retrieved from the associative array generated from the JSON message string, the count is also retrieved and incremented, a response is created containing the updated count, and the response is passed to the callback JavaScript function. The callback, in both cases, is executed within the web view and in the web view’s thread.
Having shown you the JavaScript, Swift, and Android Java to do communication between the two ‘layers’ of hybrid apps, I must say again, seldom is this type of inter-thread communication needed. Most of what you will want to do can be done directly in JavaScript, HTML, and CSS.
July 31, 2015
A Little Bit of Fun
I’ve recently put a free book up on Apple’s book store. It’s a little bit of fun I did in my ‘spare’ time. I call it “Doing Stuff With C.” Here is the URL. https://itunes.apple.com/us/book/doing-stuff-with-c/id1023155821?mt=11
I’ve tried to take a simplified, light-hearted approach to introducing C to someone who doesn’t know anything about it. I envision this as the first of a free book series, Doing Stuff With…., that covers the same material in each book but for different languages/platforms. I’m hoping to have the next book, Doing Stuff With Java, done next week.
I’d love to hear feedback on this little bit of fun and where to take the series next (I’m already planning Doing Stuff With Swift).
FYI, you will find other for-money books by me on Amazon and the other online stores. Don’t buy them. They are out of date. I did them through traditional publishers. That causes problems with keeping the information from going stale.
All of this writing AND working on Swiftly Secure??? Good thing I’m taking the next 5 weeks off from work!
Thanks.
Encryption development update
In order to continue with the development of my socialist millionaire protocol implementation that uses a 4096 bit key I need to find a generator for a Galois field of that size. This is no short term undertaking. Even using the access I have to a supercomputer it is going to take a while to find a generator.
The current level of mathematical understanding is that these generators must be brute-forced since there is no known pattern for what is and isn’t a Galois generator. So while my code is using the supercomputer to do a brute force search, I’m attacking the problem of finding a pattern. I’ve attempted to take a non-obvious approach and have already seen some interesting patterns. If what I’m seeing as patterns hold, I should be able to find a generator long before the brute force approach does. That would be nice since checking even one generator for 2^4096 values to see if the generator actually is a generator takes a long time, let alone multiple possible generators.
I’m eager to get the pattern found so I can share it with you and complete the SMP implementation.
